Circuit Theory 1 · Mesh-Current Method
#15 Mesh-current method — introduction and Worked Example 1
Builds the shared-resistor terms in a three-mesh circuit with correct signs and solves the requested branch current.
Question
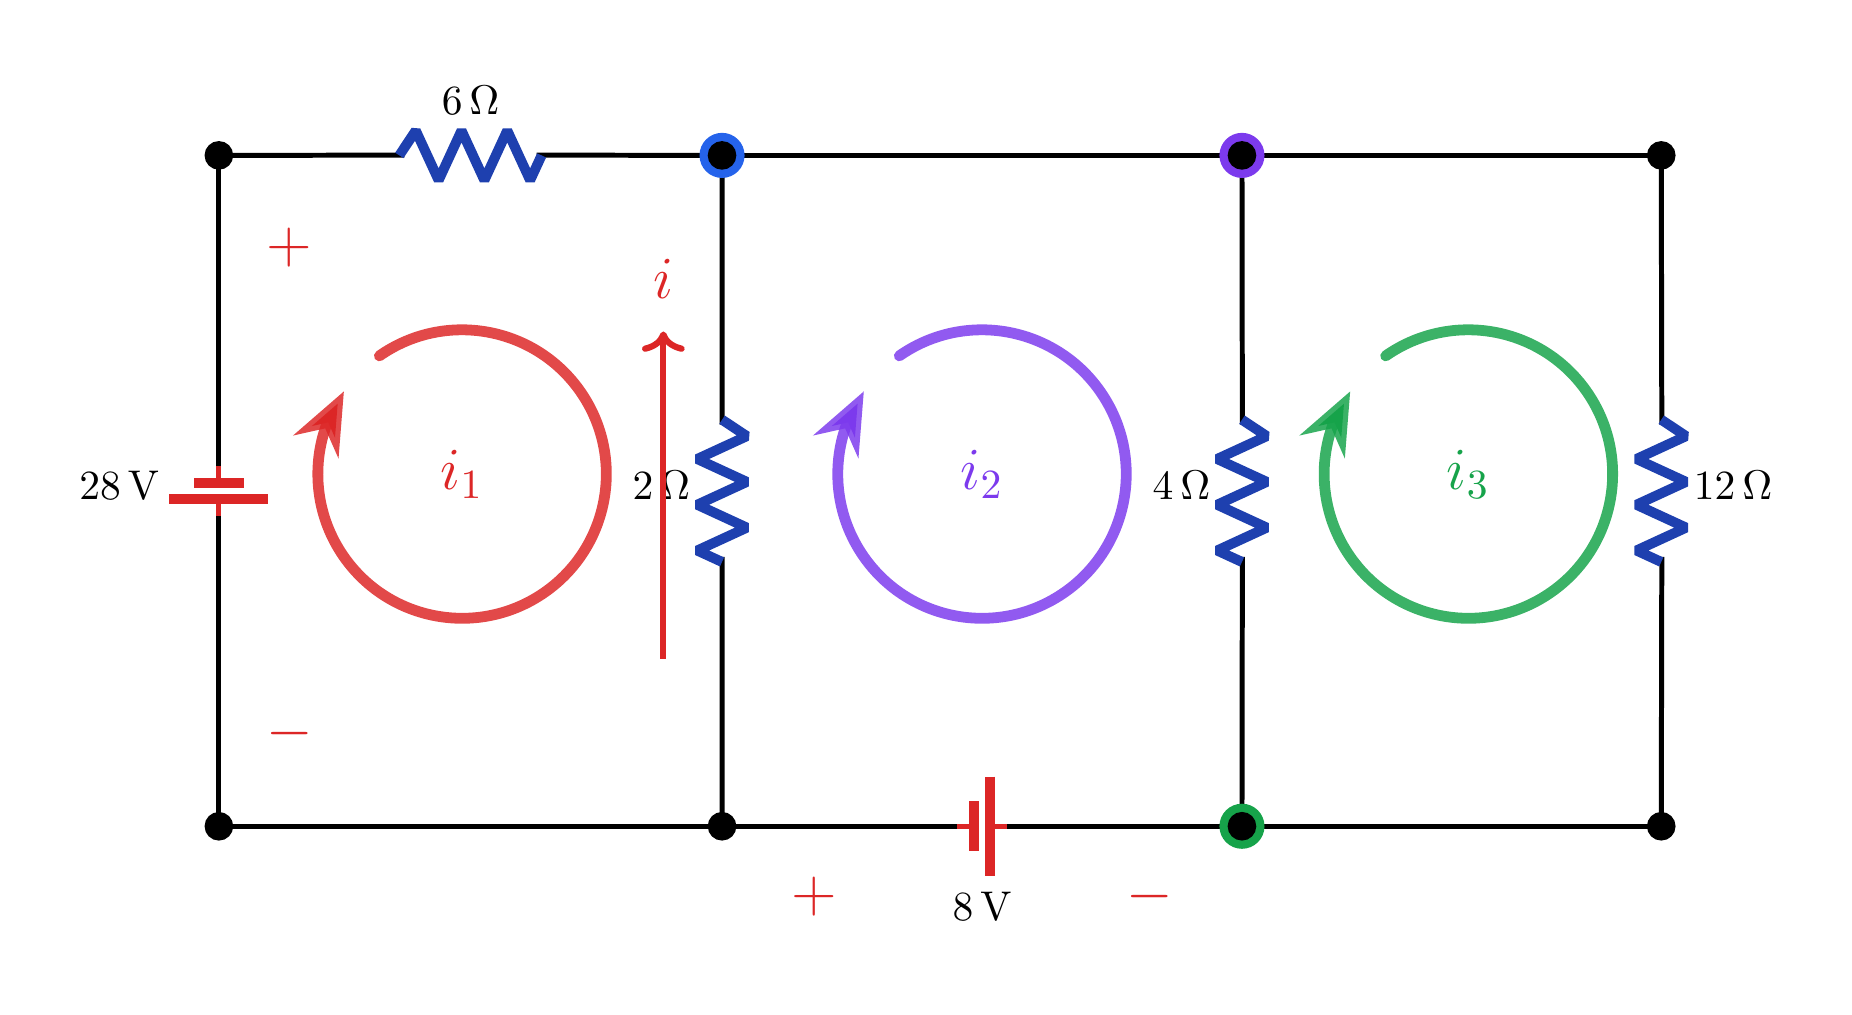
Define all three mesh currents clockwise, write KVL for each mesh, and find the upward current i in the shared 2 Ω branch.
Written solution and narration transcript(shows the full solution)
Below are all the lines written in the notebook together with the full narration transcript.
1. Why mesh currents?
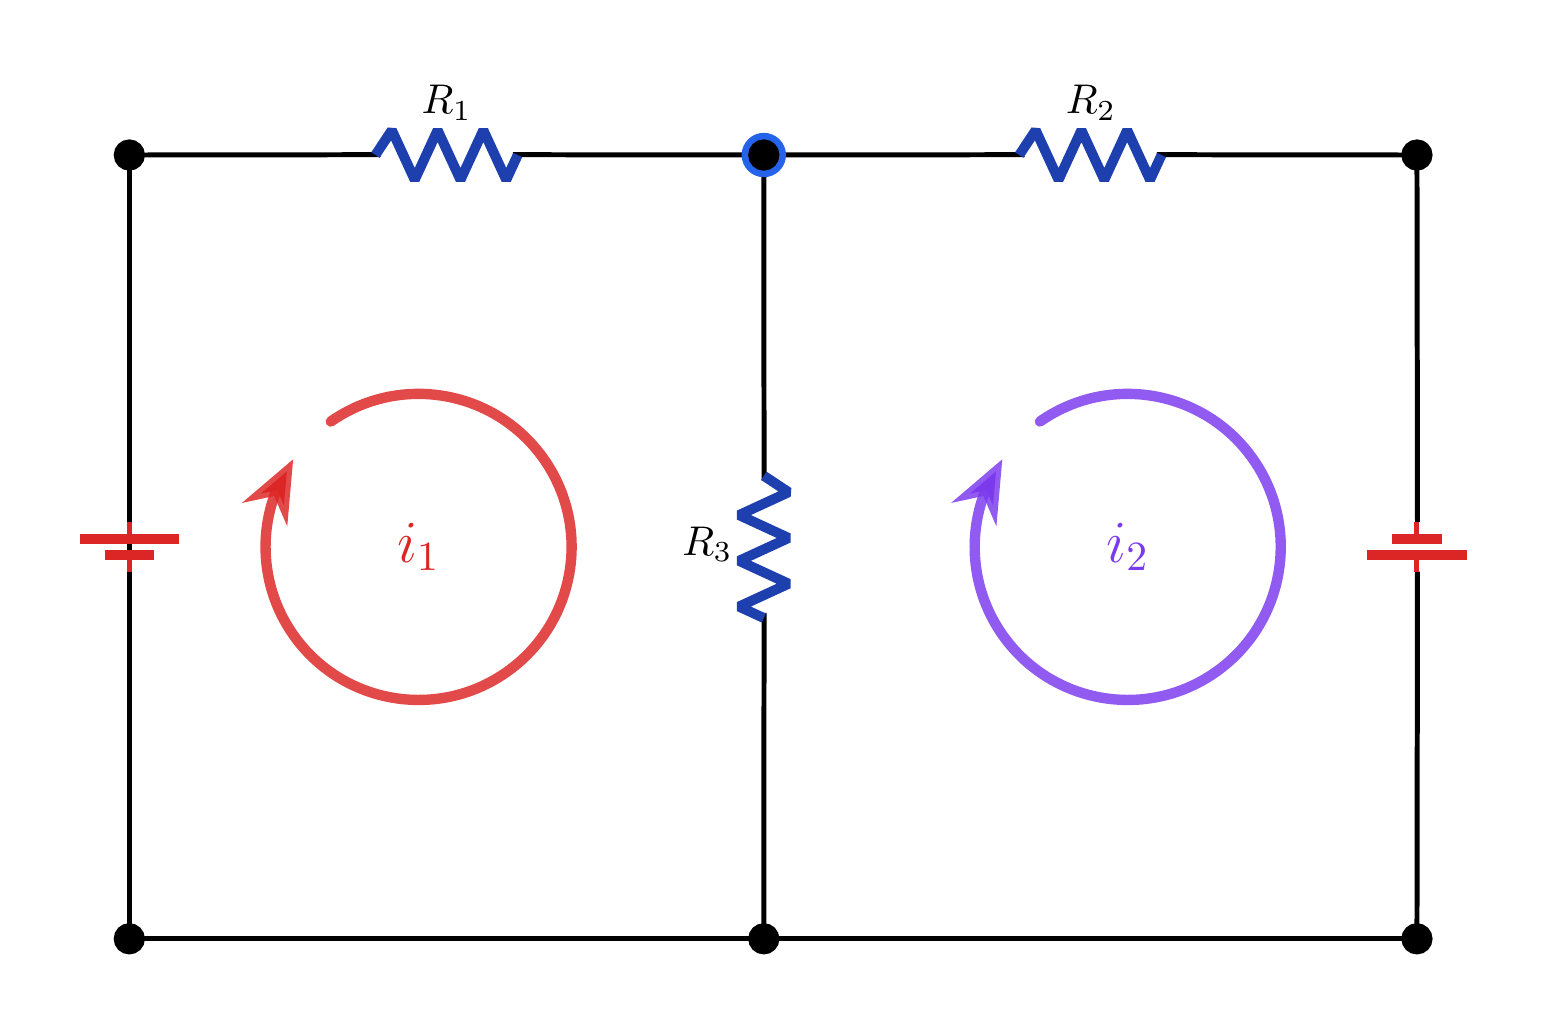
Mesh currents are auxiliary variables; the shared-element branch current is written as their difference. From node voltages to mesh currentsAssign one clockwise current to each mesh: i1, i2, …Shared-element branch current = algebraic difference of mesh currentsNarration transcript
Until now, our main unknowns were node voltages. Today we switch to a different viewpoint: mesh currents. Instead of writing Kirchhoff's Current Law at nodes, we assign one loop current to each mesh and apply Kirchhoff's Voltage Law around each loop. This works best for planar circuits, where the loops are clearly separated on the page. The key rule is simple: on a shared element, the branch current is the algebraic difference of the two neighboring mesh currents.
2. Mesh and branch currents
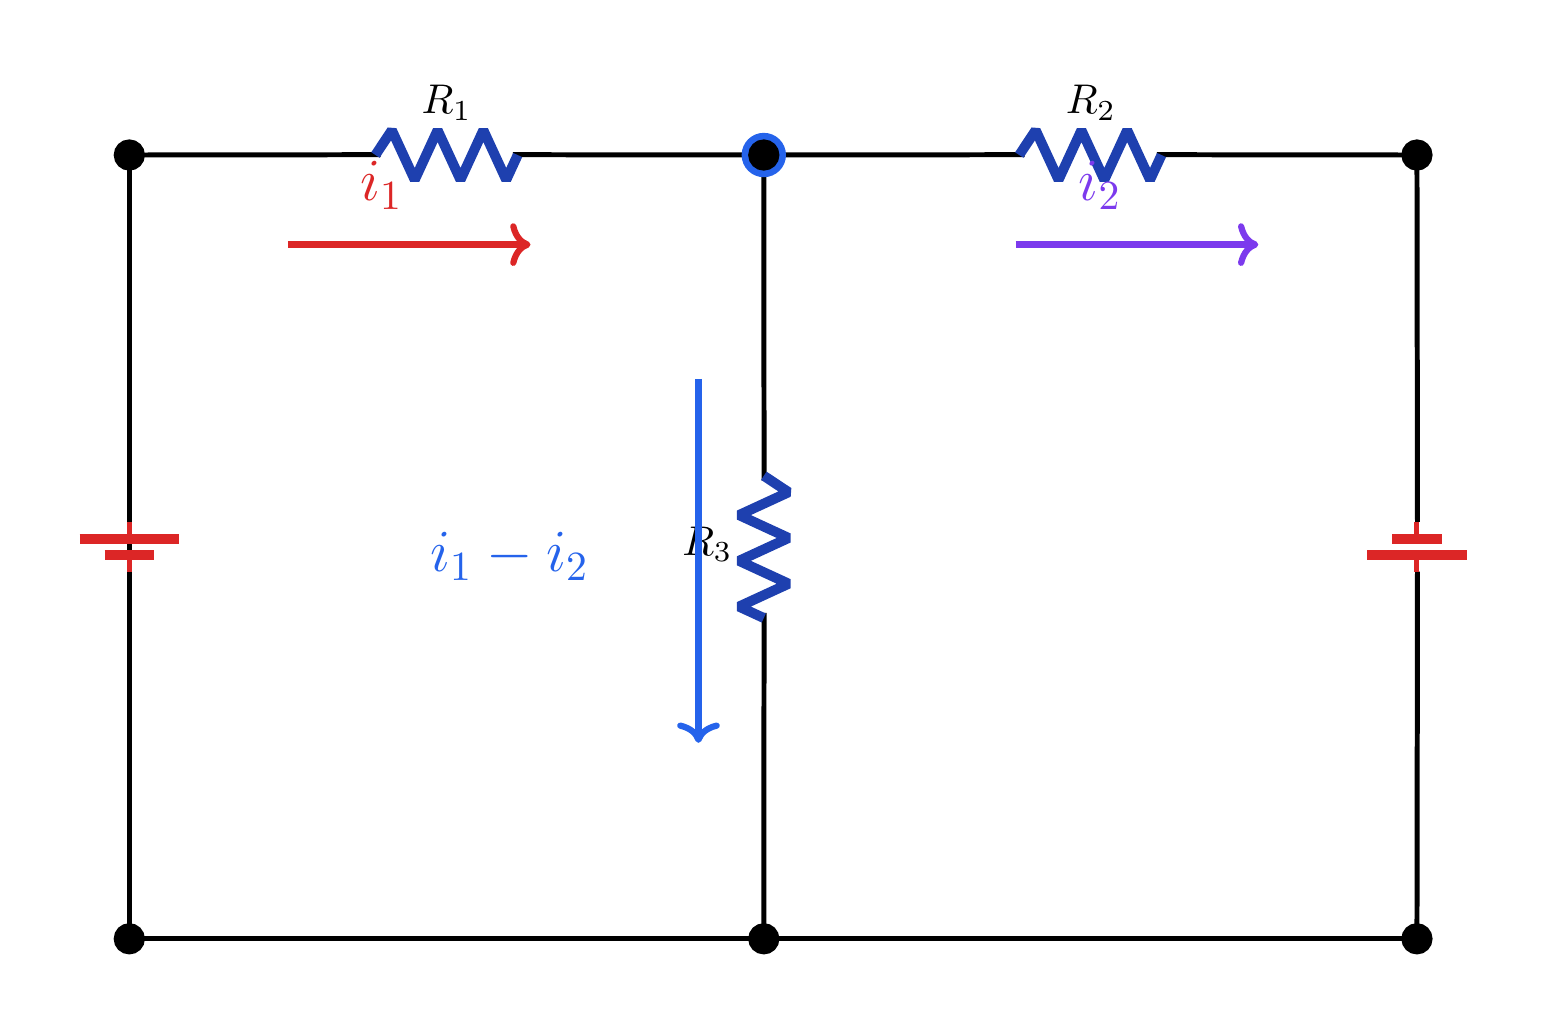
The downward branch current through shared R_3 is i_1−i_2. i1 and i2 are auxiliary mesh variablesDownward current in the shared resistor: i1−i2A negative result ⇒ the true direction opposes the chosen arrowNarration transcript
Here is the core idea behind the mesh-current method. In the left picture, i one and i two are not branch currents yet. They are imaginary loop variables that circulate around the two meshes. In the right picture, the actual resistor currents appear. For the shared center resistor, the downward branch current is i one minus i two if both mesh arrows are chosen clockwise. That shared-term pattern is what creates the coupling between loop equations. And if the solved current comes out negative, that only means the real current direction is opposite to the arrow we assumed.
3. Read the worked circuit
All mesh currents are clockwise; the requested current i is referenced upward in the shared 2 Ω branch. Left mesh: 28 V, 6 Ω, 2 ΩMiddle mesh: 2 Ω, 8 V, 4 ΩRight mesh: 4 Ω, 12 ΩFind: upward i in the 2 Ω branchNarration transcript
Now the first worked example. The circuit has three meshes. We choose all three mesh currents clockwise and call them i one, i two, and i three. The left loop contains the 28-volt source, the 6-ohm resistor, and the shared 2-ohm resistor. The middle loop contains the shared 2-ohm resistor, the 8-volt source, and the shared 4-ohm resistor. The right loop contains the shared 4-ohm resistor and the 12-ohm resistor. The quantity we want is the branch current i through the 2-ohm resistor, directed upward.
4. Loop one
All mesh currents are clockwise; the requested current i is referenced upward in the shared 2 Ω branch. Narration transcript
Start with loop one. As we move clockwise, we see a 28-volt source and two resistor drops. The 6-ohm resistor carries only i one, but the 2-ohm resistor is shared, so its branch current is i one minus i two. So the first KVL line is negative 28 plus 6 i one plus 2 times i one minus i two equals zero. Now distribute the 2-ohm term carefully: 2 times i one minus i two becomes 2 i one minus 2 i two. That is why the i one terms add to 8 i one. Moving the source term to the right gives the first mesh equation: 8 i one minus 2 i two equals 28.
5. Loops two and three
All mesh currents are clockwise; the requested current i is referenced upward in the shared 2 Ω branch. Narration transcript
Now loop two. Both resistors in this loop are shared, so the drop terms are 2 times i two minus i one, and 4 times i two minus i three. The 8-volt source also appears in the loop. Following the clockwise path, we cross the 8-volt source from its negative terminal to its positive terminal, so it is a voltage rise. Therefore loop two gives 2 times i two minus i one plus 4 times i two minus i three minus 8 equals zero. When you distribute those shared terms, you get 2 i two minus 2 i one plus 4 i two minus 4 i three minus 8 equals zero. Now the i two terms combine into 6 i two, so loop two becomes negative 2 i one plus 6 i two minus 4 i three equals 8. For loop three, only the 4-ohm resistor is shared. So we write 4 times i three minus i two plus 12 i three equals zero. After distribution, that becomes 4 i three minus 4 i two plus 12 i three equals zero, so the final loop-three equation is negative 4 i two plus 16 i three equals zero.
6. Solve the system
All mesh currents are clockwise; the requested current i is referenced upward in the shared 2 Ω branch. Physical branch current: 1 A downwardNarration transcript
Now solve the three equations together. From the third equation, i two equals 4 i three. Substitute that into the second equation and then use the first equation. The results are i one equals 13 over 3 amperes, i two equals 10 over 3 amperes, and i three equals 5 over 6 amperes. All three mesh currents are positive, so their clockwise reference directions are consistent with the solution. The asked branch current through the 2-ohm resistor is upward, so it equals i two minus i one. That is 10 over 3 minus 13 over 3, which gives negative 1 ampere in the upward reference direction. So the physical branch current is exactly 1 ampere downward.
7. Method summary
All mesh currents are clockwise; the requested current i is referenced upward in the shared 2 Ω branch. 1) Assign one current to every mesh2) Write KVL; use current differences on shared elements3) Solve the system and interpret every sign physicallyNarration transcript
That is the full workflow of the mesh-current method. First assign one loop current to each mesh. Then write Kirchhoff's Voltage Law around each loop. On every shared element, use the current difference between neighboring meshes. Finally solve the linear system and interpret the sign of each result. A negative mesh current is not a mistake. It only means the true current direction is opposite to the arrow you started with. In the next lesson, we will continue with more mesh-analysis examples.
Source video: Circuit Theory #15 | Mesh-Current Method — Intro + Worked Example 1 (5:14)